Introduction
SecureDocMan’s Automated Backup feature provides a way of synchronizing the document revisions in your SecureDocMan account into an Amazon AWS S3 storage account of your own. The result of this synchronization is a highly-reliable off-site location where your documents will always be available even if you leave the services of SecureDocMan. This backup can also be used to perform your own batch-downloads of your files when the need arises to download the files to your local computer or to another backup service.
Settings
A user with Company Super-Admin permissions will be able to configure the system to enable automated backups. There is a field in the Company Settings page where you can enter the name of an Amazon S3 “bucket” to use. This bucket will be one that you have created in your own AWS S3 account. You will enter that bucket name in the form of “s3://mybucketnamehere”. When you enter this bucket name and save the settings our system will attempt to create a test file called “securedoctest” in your bucket. If successful you will begin to see folders and files created in your bucket.
Steps:
- Create an Amazon AWS account if you do not already have one:
- http://aws.amazon.com/s3/ and click Sign Up
- Once signed up and you are logged into the AWS web console you can click Services->S3 to go to the S3 storage management tool.
- Create a bucket that you will use for your SecureDocMan backups:
- Click the “Create Bucket” button in the AWS S3 page.
- Required: Choose "US East (N. Virginia)" as your Region. This may also be called "us-east-1".
- Finish with the bucket settings and save.
- Select the new bucket you just created
- Click the “Permissions->Bucket Policy” button
- Click the “Policy Generator” link
- Select “Policy Type: S3 Bucket Policy"

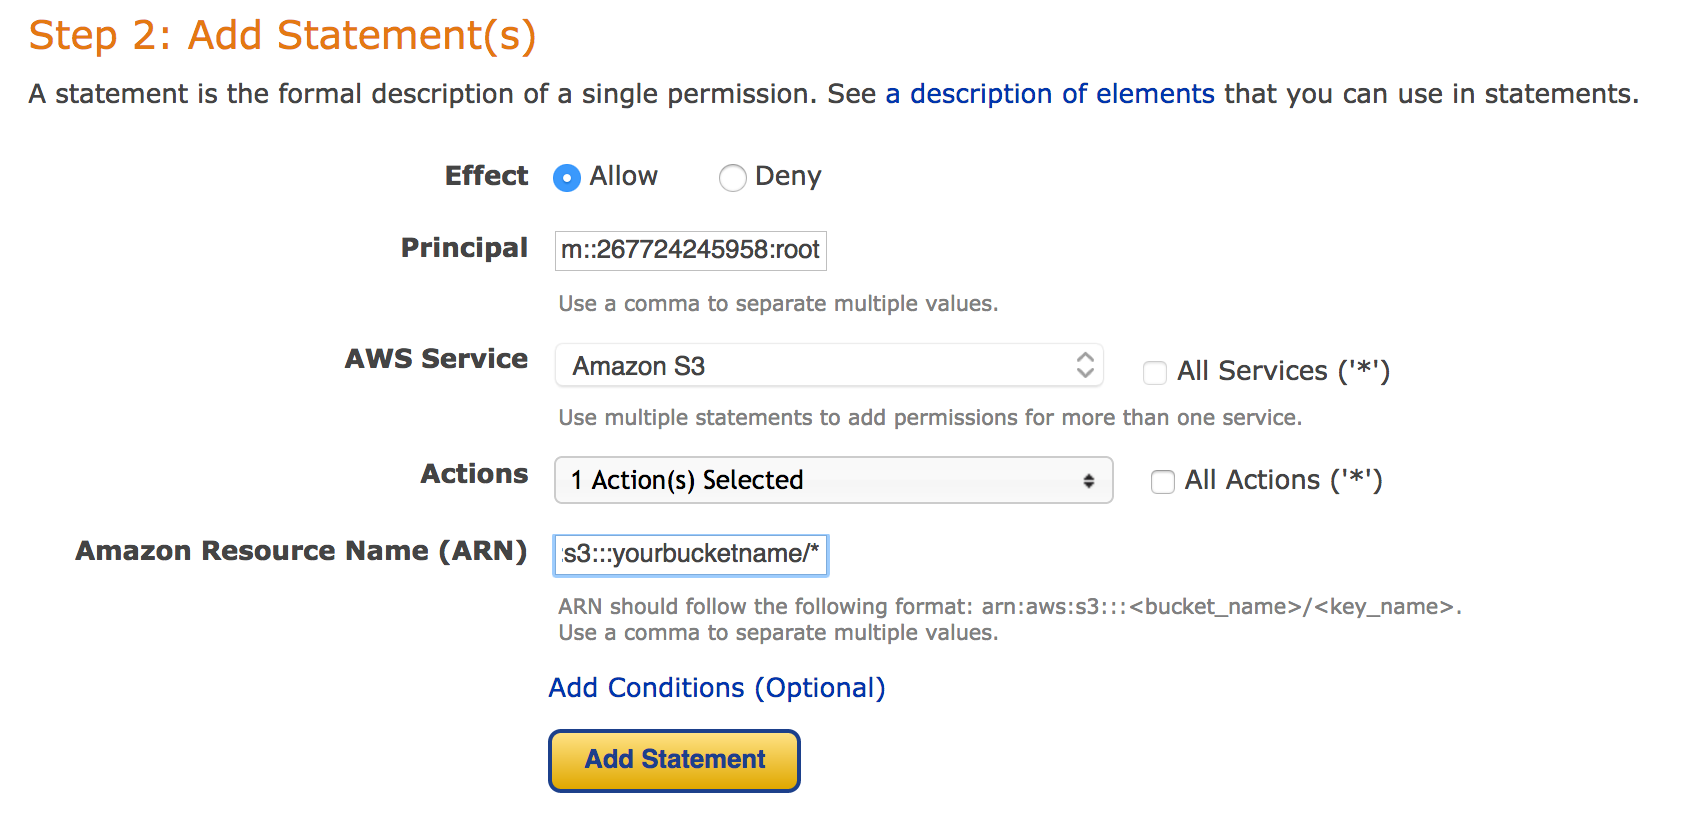
Add the following values to the Add Statements form:
- Effect: Allow
- Principal: arn:aws:iam::267724245958:root
- AWS Service: Amazon S3
- Actions: PutObject
- Amazon Resource Name (ARN): arn:aws:s3:::yourbucketname/*
- Change yourbucketname to the name of the bucket you previously created
- Make sure you have the /* on the end
- Click “Add Statement"
- Click “Generate Policy"
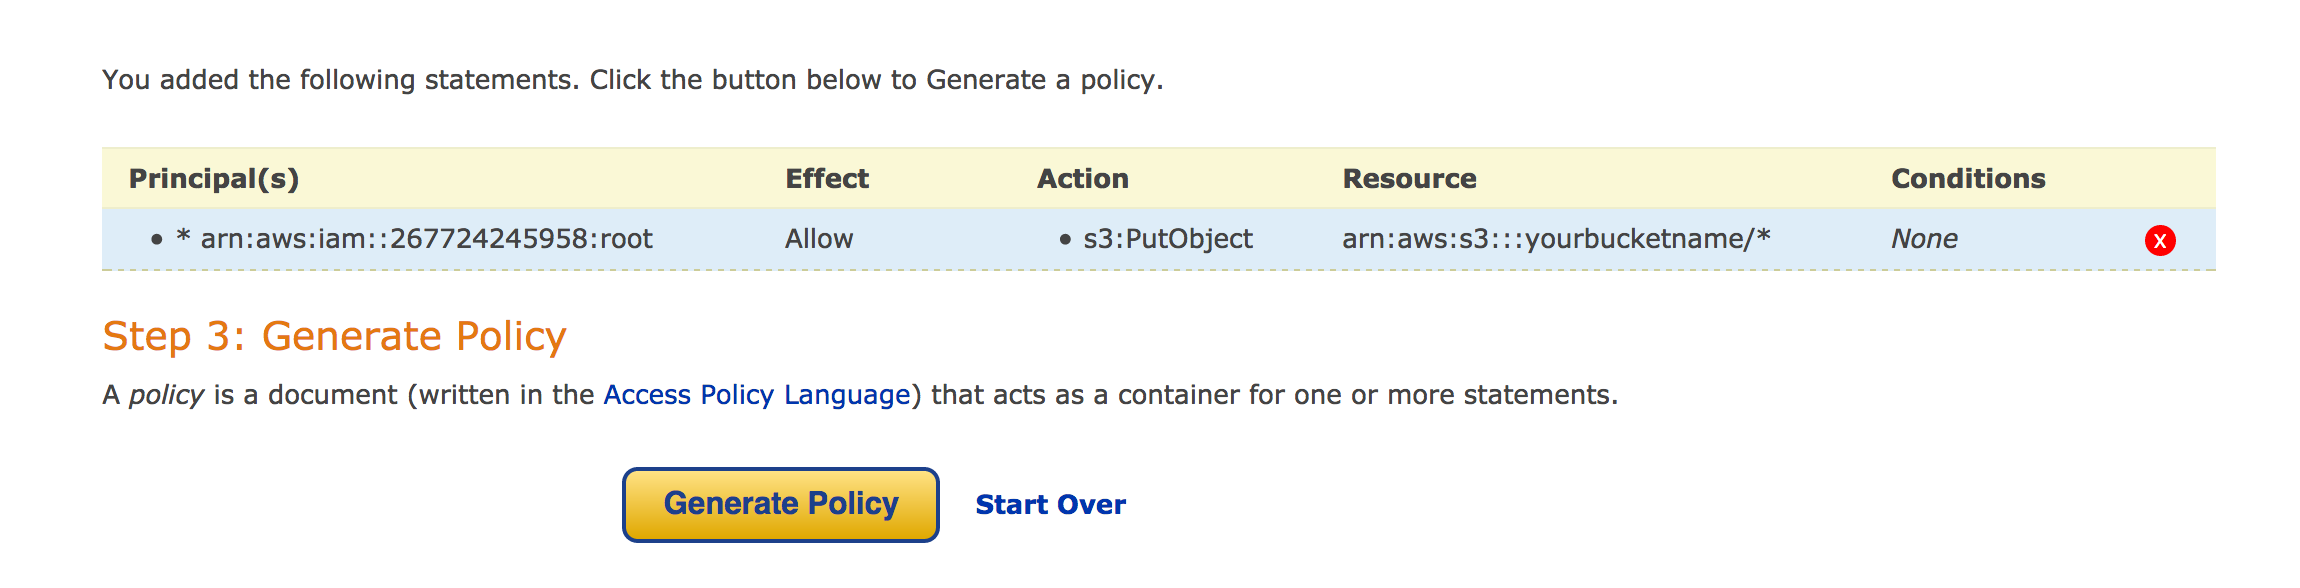
- Select and copy the text in the popup window. This is the policy you will use for your bucket policy.
- Click Close
- Go back to your bucket window
- Paste in the policy you had generated in the previous steps
- Click Save
You should see a green checkbox next to the save button then the window will go away. If you edit the bucket policy again you should see the text you just saved.
Now you are ready to configure your SecureDocMan account:
Steps:
- Login as a Company Super-Admin user
- Click on “Settings->Companies->edit"
- Find the automated backups section and enter your bucket name:
- example: s3://yourbucketname
- If the bucket policy was done correctly you should see a response stating that your company settings were saved. You are now automatically backing up documents to your new bucket. If you go back to the bucket list now and refresh the page you should see our test file.
- If you receive an error you may have entered your bucket name wrong or generated a policy incorrectly.
- If you experience any issues during this process you may contact us at support@securedocman.com and we will be happy to assist.
Accessing Your Backups
Your files will show up in the S3 Bucket with something like this folder structure:
/mybucket/doc/000/000/001/000/111/123/12312
Which relates to:
/mybucket = your bucket name
/doc = the folder we place your documents in
/000/000/001 = your company ID of 1
/000/111/123 = the document ID of 111123
/12312 = the revision ID 12312
The backup files will remain in your bucket as long as that bucket exists. If you would like to access your files directly or download all of your files locally you can choose from a list of S3 tools including:
- CyberDuck (free FTP client)
- AWS Console (web based)
- AWS Command Line Interfact (aws-cli)
- S3 Command Line Tool (s3cmd)
Note: You will need some form of access settings in order to use one of these tools. Please see this page that describes various security credentials:
You can always access your individual files by logging into the AWS Console at https://aws.amazon.com. We will use the CyberDuck FTP Client to show you how you could download your entire bucket to your local computer.
CyberDuck Walkthrough
- Download and install the free CyberDuck FTP client: https://cyberduck.io
- Run CyberDuck and click the Open Connection button
- Choose S3 Amazon Simple Storage Service
- Enter your S3 access key id
- Enter your S3 secret access key (see AWS Security Credentials Documentation)
- Click Connect
- Locate your bucket, right-click and select "Download As.."
- Choose a location and click “Download"
- The files will begin to copy to your local computer into the location specified.
For additional information on the Amazon S3 Storage system you can visit the Amazon help center here:
0 Comments